If you can dream it, you can do it.
/Walt Disney/

Showing posts with label graphic pattern. Show all posts

Wednesday, June 19, 2013

White Fairy Tale Tablecloth


White Fairy Tale Tablecloth as a Shawl

Oh my Goodness! This is not a tablecloth! It's something beautiful... wonderful... great... awesome... stunning... excellent... outstanding... overwhelming... I know... I know... I'm not very modest... But I soooooooo love the finished tablecloth which I made for my Mom who is living far away from me. I also want the same or similar item! But I'm not sure I would ever do something like that again... I was crocheting it since last August, it's almost a year. Here and here you have seen the progress. It took more than an hour to crochet last round, which length is approximately... I have to measure... Done! It's 5,7 metres in circumference.

White Fairy Tale Tablecloth


Fringe... At the beginning I wasn't thinking about the fringe, but when I finished the border I thought that it would be better with this. So I hung 464 fringes(I can't believe) which weight was 245gr of yarn. For the each fringe I've cut 4 strands of the yarn, it's 735 metres in total.
 :) I love statistics!
The total weight of the tablecloth is  745g.
The diameter is 170cm(140cm without of fringes).
Various Acrylic DK white yarn and a 4mm hook.

White Fairy Tale Tablecloth the Border


I would love to take a picture of the tablecloth covering the round table, but I have not this. So looking forward my Mom will take the picture, she has a round table surely.
Oh, I forgot the most important thing: this is not only tablecloth - it also can be worn a shawl! Yes! It looks great dressed on me! Isn't it?

I don't know where I had found the graphic chart, it was a while ago. I'm just posting these two pictures and I apologize if I'm violating someone's rights.

graphic chart part I
Part I
graphic chart part II
Part II

I made 43 rounds only, then I've added 3 rounds of chain web(ch 5, sc, etc...) and then this border:

the border

But in 7th round instead of 1 dc and picot, I worked (1 dc, picot, 1 dc) in ch-2-space of previous round. And the very last round I came up with a ch 5 and sc in between the group of (1dc, picot, 1 dc). And then the fringes very easy goes in ch 5 space! 
I'm so glad I finished this project!

I wish you to have a wonderful day!
Hug you
Olga 

Todays Party at:
Лепестки

Sunday, May 20, 2012

Alisha's Summer Hat

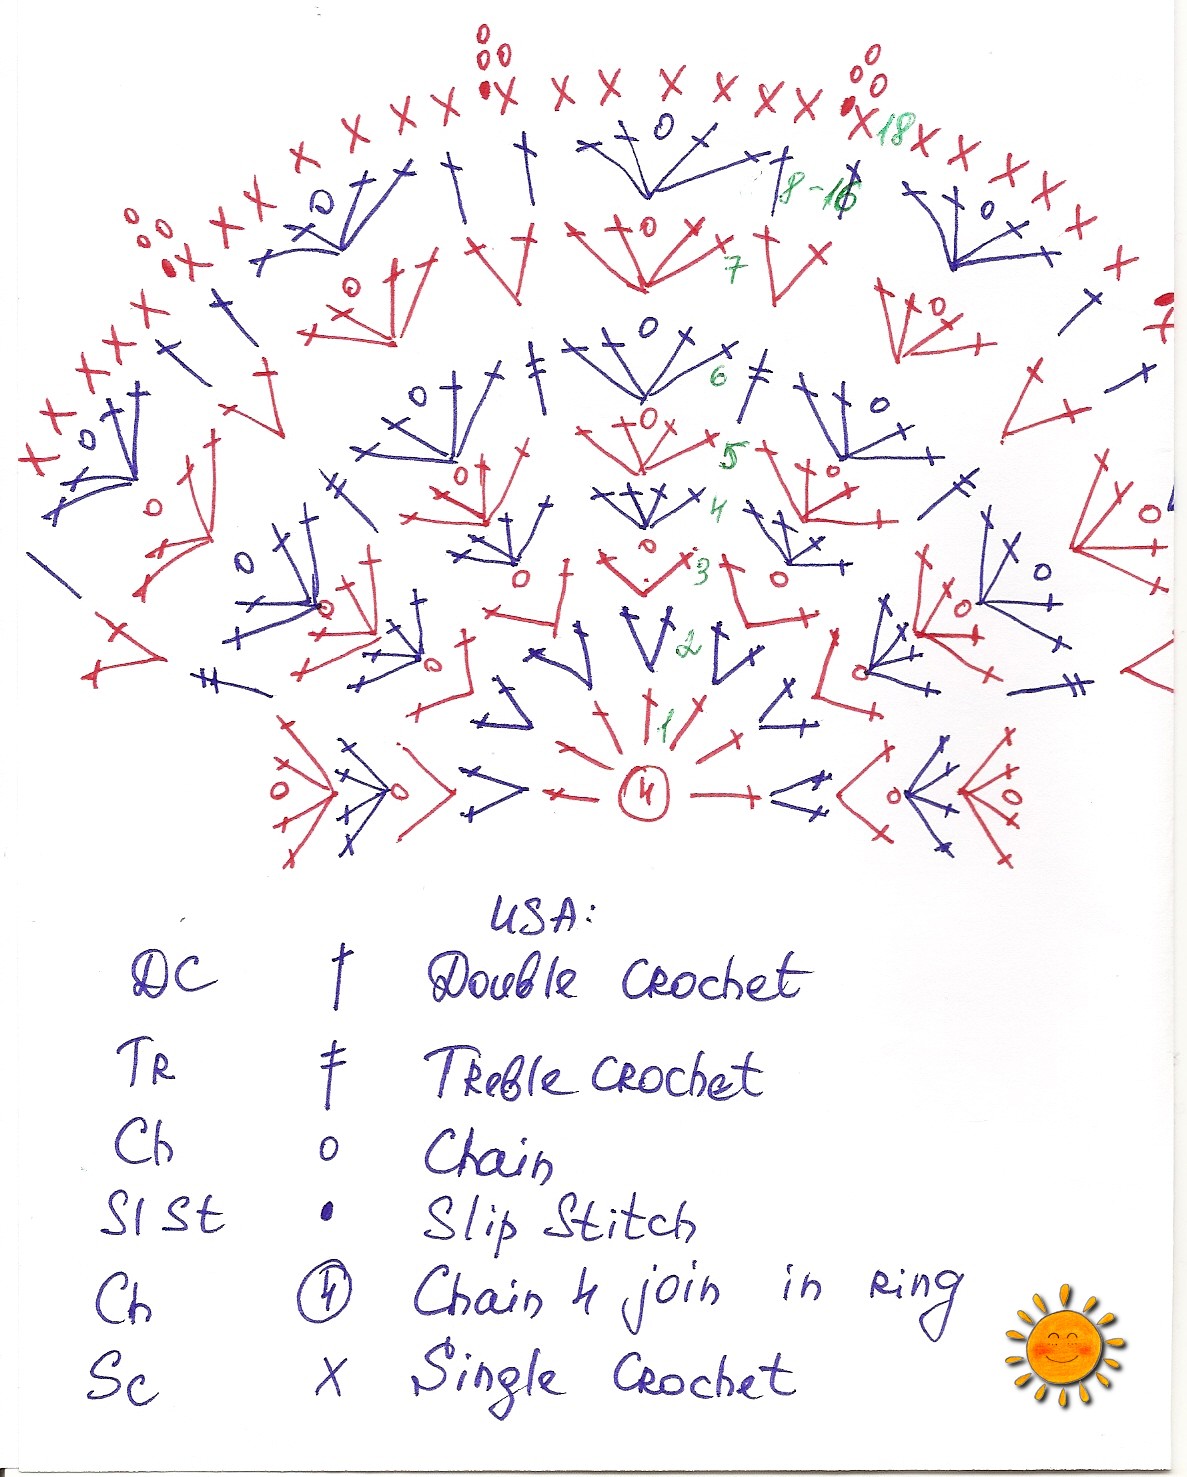
 One day I noticed that I needed to make a few cotton hats for my daughters. Here is one of them for my younger daughter.
 
Alisha's Summer Hat 3

A description of the hat.
 The head circumference of my 2,5 years old girl is 48cm.
The size of the finished hat: is 21cm in width, and 17cm in height.
The yarn I've used is 100% Cotton DK by Patons UK (210m/100g) in Nectarine color.
And a 4mm hook.

 Ch 4 join in the ring with a slip st
Rnd 1:  12 DC in the ring
Rnd 2:  2 DC in each st around
Rnd 3:  (DC, ch 1, DC) - in every 2nd st around
Rnd 4:  4 DC in each ch-1-space around
Rnd 5:  Cluster(2 DC, ch 1, 2 DC) - in the middle of each 4-DC-cluster
Rnd 6:  *(2 DC, ch 1, 2 DC) - in ch-1-space, 1 Treble in the space between the clusters, repeat from * around
Rnd 7:  *(2 DC, ch 1, 2 DC) - in ch-1-space, 2 DC in Treble - repeat from * around (84 st)
Rnd 8:  *(2 DC, ch 1, 2 DC) - in ch-1-space, 1 DC in each of the next 2 DC between the clusters - repeat from * around
Rnd 9-16:  As Rnd 8
Rnd 17:  Sc in each st around(84 st)
Rnd 18:  *6 Sc, ch-3-Picot - repeat from * around. Fasten off, hide the ends, attach a lovely flower and enjoy your girl's new hat!

How I do a Picot: Sc, ch 3, slip st in the sc (insert hook through the front loop of sc and left vertical bar of the same sc).

The lovely flower pattern I found here.

Also a graphic pattern of the hat, where it is missing, hehe, Round 17. You should do sc in each st around in that round.


Alisha's Summer Hat graphic pattern


Alisha's Summer Hat 2

Alisha's Summer Hat 1
My beautiful girl does not like to wait while I'm doing enough pictures...
Alisha's Summer Hat_flower 1
Flower. Unknown Lithuanian cotton.
Alisha's Summer Hat_flower 2
Without a camera flash...
Alisha's Summer Hat_flower and edging
Picot edging
I hope everything is clear... I'll be very glad if you share with me your hat made ​​with the pattern! 


I wish you all a sunny day!
With l♥ve


Spring Dandelion


Sunday, March 4, 2012

Spring Granny Blanket

Hurray! My granny square blanket is fully completed! A first time I made such a big blanket!

Spring Granny Blanket

The size is 140cm*175cm.

Spring Granny Blanket

The colours of the blanket I've been associated with a spring.

Spring Granny Blanket

I like the colours!

Spring Granny Blanket
 
 I like the dimension! 

Spring Granny Blanket

I love this blanket because it's FOR ME!!!  

Spring Granny Blanket

It is so cool to wrap myself from head to toe... m-m-m... so nice... Or seat under it with my lovely girls together... Or with my husband... 

Spring Granny Blanket

So the blanket contains 8*10 squares. Each square contains 7 rounds. The first three rounds are a circle, 4th round forms a square  with trebles in corners. Below is a description. Contact with me, please, if there is something wrong you notice.

US symbols:
dc - double crochet
tr -  treble crochet
ch - chain

Ch 4 joining in ring;
1 rnd: 12 dc in ring;
2 rnd: in each of 12 spaces between the stitches - [2 dc together, ch 1];
3 rnd: in each of  ch-1-spaces - (3 dc, ch 1);
4 rnd: working in each ch-1-space. *In 1st space to form a corner (3 tr, ch 2, 3 tr), ch 1. In each of  next 2 spaces (3 dc and ch 1). From * repeat 3 more times;
5 rnd: working in each ch-1-space. *(3 dc, ch2, 3 dc) for a corner, ch1. In each of  next 3 spaces (3 dc and ch 1). From * repeat 3 more times;
6 rnd: working in each ch-1-space. *(3 dc, ch2, 3 dc) for a corner, ch1. In each of  next 4 spaces (3 dc and ch 1). From * repeat 3 more times;
7 rnd is a joining round. 
How to join squares with my most liked join-as-you-go-method.

About the border. It is so simple. Just 3 dc and ch 1, 3 dc and ch 1, etc... And in corners 2 dc, ch 2, 2 dc. As many rounds as you want. But I made 10 rounds.

Spring Granny Blanket the border

Spring Granny Blanket the border

Spring Granny Blanket the border

And below is a graphic pattern (in U.S. symbols) of the square in which I drawn only 5 rounds. The round 6 and 7 you will continue in the same manner as round 5.

Spring Granny Blanket square pattern

After I finished this blanket, I felt I am empty... A few days I didn't crochet anything... Only thinking about my unfinished projects. Which of this will be next... So I decided to take up African flower hexagons. It will be a bag!


African flower hexagon

See you soon with a heart garland I finished a few days ago!
I wish you a spring sunny day!
With love
Olga

Saturday, February 25, 2012

Leg Warmers for Anastasia's Dance Classes

These leg warmers I've finished almost one month ago. I've planned to make it a long time ago... may be one year... for my older daughter... And finally I made these in the end of January after Anastasia's competition. The colors are almost the same as her dance uniform. Black skirt and jersey with an embroidery in orange, apple green and white colors. So I've tried to make a set...

Leg Warmers
Leg Warmers

Leg Warmers

Leg Warmers.Anastasia

And below is the graphic pattern and the description

Leg Warmers pattern
I've used a hook 4mm (USA/6, UK/8)
with 100 % wool yarn: 
Orange - Latvian 100% wool (Ogres Jarns)
Black - YarnArt Prestige;
also blend of 50% wool  and 50% acrylic:
Green Apple - YarnArt Super Merino
White - YarnArt Merino De Luxe.

The symbols:
Dc - double crochet
ch - chain
sl.st - slip stitch
st - stitch
cluster - 3Dc in a space between two stitches

The total amount of beginning chain must be divisible by 3.
Ch 36 join in ring.
Round 1: ch 3(as 1st Dc), Dc in next st and each st across the round, join with a sl.st in the beginning 3rd ch of previous rnd;
Rnd 2: In a space between the first two stitches - [sl.st, ch 3(as 1st Dc), 2Dc], *skip 3 st, 3Dc in a space between the 3rd and 4th stitches, repeat from * across the round, join with a sl.st, cut off the thread.
Rnd 3: Attach a new color in 3rd Dc of any cluster. Ch3(as 1st Dc), Dc in next st and each st across the round, join with a sl.st;
Rnd 4: In a space between the first two stitches - [sl.st, ch 3(as 1st Dc), 2Dc], *skip 3 st, 3Dc in a space between the following 3rd and 4th stitches, repeat from * a
Repeat Round 3 and Round 4 as many  times as you need remembering to attach a new color every 2nd round.
 I made 13 color stripes.

 Ask me for a help, please, if you think that the pattern or the description are not clear.

On the second and third picture you can see frames and a link to my blog - it the result of the study of the
FastStone Photo Resizer software. I use this a long time to resize pictures. And just now  I've learned about the possibility to add frames, text, watermarks and other tricks... And now I really want to know what a software I could use to make a rounded corners for pictures.

Have a nice Sunday!!!
Appreciate each other!

With sunny wishes for you!
Soleil

Saturday, February 18, 2012

Coaster's Pattern and a List of my Wips

 I have drawn for you, my creative readers, a graphic pattern of coaster from previous post in which I told  about a Rainbow Set. I hope the pattern is clear... Frankly, I would like to learn to use some software for drawing patterns, but... but... but... this going to take a lot of free my time(I think so) which a have not. Therefore below you can see a graphic pattern drawn by me. I think it is better than nothing and you can do the same thing for your kitchen and dining room or may be for a gift...

Rainbow Coaster's Pattern
*** 26/03/2013 Edited to add ***  Here you will find the written pattern for the coaster.

And I have a few work-in-progress projects... Try to count them:
 1. A shawl for my mom. Ooooh, it is my headache. Sorry, my sweet mom... I really want to make for you this nice shawl. I promised to present it to you as a Birthday gift(in December of last year). The yarn I used for the shawl is so uncomfortable for me - 8 thin strands which not twisted together with each other... 
 2. African flower hexagons for a bag! A colorful bag for me using a cotton yarn.
 3. Granny square's blanket for me, which will be finished very soon, here it is:

Granny Square Blanket

4. A blanket  which I have started with  A Granny a Day
CAL. I talk about it here on my other page. I do each of squares every night before I going to sleep, but I make pictures of it not so often...


 5. A blanket for my younger son I have started two days ago. Just big plain colorful squares.
6. And... and... and... HEART GARLAND!!! Love love love hearts!   Love garlands!

Heart Garland

Total 6 projects. Stunned! And I have the same amount of projects in my head!
That's all for today, my dears! 
I'm going to crochet!Have a nice day and a nice Sunday and a nice every day! 
Olga 

I'm linking at Crochet Boulevard

Sunday, January 29, 2012

Granny Stripe Blanket!

Hello my friends!
The last two weeks while I had no posts to my blog I did my wip projects. The first is a Granny Stripe Blanket which is fully done.  It is my first project with which I have reduced a little bit my big stash of yarn. I'm so happy about that! While I've crocheting my Granny Stripe I had no idea totally to whom it will be. Until one day my DH(Dear Husband) said me about so pretty colors of blanket and asked me to give him it. So I decided to present him this blanket. And now he is so happy too.  :)

Granny Stripe Blanket  
The dimension is 100*150cm.

Granny Stripe Blanket

I've used a Baby 100% Acrylic yarn with a 6 mm hook.

Granny Stripe Blanket

Below is a graphic pattern of the border.
Granny Stripe Blanket Border
At the pattern you can see two circles on a top of each cluster, that means a piсot: chain 2, sleep stitch in first chain.
Now I'm working with other granny square blanket, which progress I'll show you next time. Also I start to make a shawl to my Dear Living-Far-Away Mammy.

Sunny days for you, my dears!
Olga


P.S. Tomorrow my daughter Anastasia will take part in Irish Dance Competition... And I wish
her to dance as good as she can... 

Saturday, December 10, 2011

Star Garland is Done!

Hello my dears!
Today is Saturday and I'll show you my Star Garland fully finished! I couldn't decide which pictures to choose, so I'll show you all of them.


Here is a progress of done work.


Here is the pattern.

Star Garland

I wish you a warm and sunny end of the week-end (if I can say that... )
 Olga
☼☼☼☼☼

I'm linking at Crochet Boulevard
Related Posts Plugin for WordPress, Blogger...
Blogging tips