Monday, May 19, 2014
Tuesday, January 7, 2014
Colour Rush Blanket
I finished two expressive bright blankets!
The big one for my daughter with unusual for me yellow coloured border.
I'm very happy with this blanket because it is so colourful and bright, as well it was just an excellent mood enhancer while I was crocheting it.
Here and here you can see a few pictures about the progress.
I didn't have any pattern ideas when I've started, only thing I wanted was to start with a few granny squares joined in a rectangle.
So a quick description for those who want to create something like this blanket:
I fell in love with this border as soon as I saw it here (free Ravelry download).
It turns out fairly large in size 140x180cm!
I've used for it almost 1.4kg of acrylic yarn in 12 different bright and yummy shades of Stylecraft Special DK mostly. Ravelry project.
I think it is enough for today so the second finished blanket I'll leave for the next time :)
The big one for my daughter with unusual for me yellow coloured border.
I'm very happy with this blanket because it is so colourful and bright, as well it was just an excellent mood enhancer while I was crocheting it.
Here and here you can see a few pictures about the progress.
I didn't have any pattern ideas when I've started, only thing I wanted was to start with a few granny squares joined in a rectangle.
So a quick description for those who want to create something like this blanket:
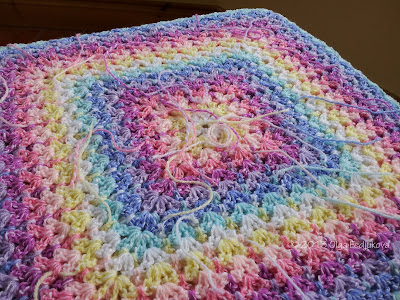
- I started with two granny squares in 6 rounds each, then I joined them together
- and made around them 9 granny stitch rounds.
- I started making tiny granny squares in 3 rounds each and joined them around the blanket using join-as-you-go method (here and through). 30 little squares in total.
- 15 rounds of granny stitch around.
- 12 circle-in-a-squares in 6 rounds each. The pattern for these squares is the same which I've used for making Spring Granny Blanket. These squares attached on two short opposite edges of the blanket only.
- 21 rounds of granny stitch around whole blanket.
- Using the same colour as for the border 1 round of sc, 3 sc in each corner.
- The border! (see the link below the following picture)
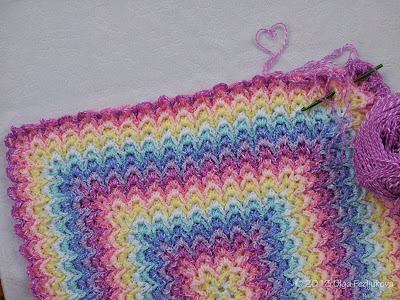
I fell in love with this border as soon as I saw it here (free Ravelry download).
It turns out fairly large in size 140x180cm!
I've used for it almost 1.4kg of acrylic yarn in 12 different bright and yummy shades of Stylecraft Special DK mostly. Ravelry project.
I think it is enough for today so the second finished blanket I'll leave for the next time :)
Have a wonderful day
and
take care of each other!
Olga
Sunday, November 24, 2013
Bargello Blanket! Ta-Dah!
The Bargello Blanket is finished! The most of yarn colours are used up, so I have a beautiful soft and cozy baby blanket. Its size is 84cm square and it finished with a simple border in two sc rounds (Candy Floss + Sherbet). I was working the second round in back loops only. I have used 450g of yarn, it was Stylecraft Special DK, blend of acrylic and cotton(27%).
I enjoyed the process, it was easy to crochet this blanket and I'm very happy with the result! A big Thanks to Lena for the opportunity to create this miracle! The blanket likely will be added to my ETSY shop. Here you can see a last gallery of others Bargello.
Now I can continue to crochet a blanket for my oldest daughter, there is left to be done the border only.
I would choose white, but then I thought that Anastasia will choose her favourite pink colour. But my daughter's choice for the border colour is Citron!
So be it! :) Here is a little sneak peek of first border round.
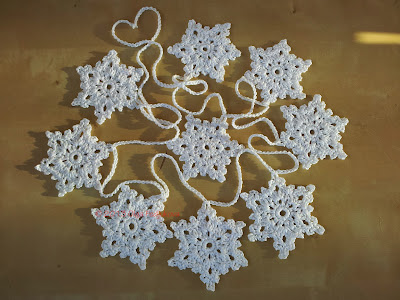
The Snowflake Garland that you see at the last picture goes to Oksana within the Christmas Gift Exchange. Take a look at her blog Oksana+Hobbies, you will not be disappointed, Oksana is a big fashionista and a very creative person.
Have a wonderful day!
Olga
♡
Мой совместный проект закончился на 3м этапе... Жаль, что так быстро. А всё потому, что закончилось большинство цветов, остались Magenta, лимонный, Candy Floss и Sherbet, и то, только на один ряд, а то и меньше, так что, мой пледик готов! Его размер - 84 см квадрат. Ушло 450 гр. Напомню что я вязала крючком 5,5 мм, а ниточки - смесь акрила и хлопка(27%), 260м/100гр.
Для обвязки я сделала два ряда (Candy Floss + Sherbet) простыми столбиками, причем во 2м ряду столбики вязала за заднюю стенку.
Я получила огромное удовольствие от процесса, вязать было легко, и я очень довольна результатом! Плед оооочень мягкий, толстенький и уютный. Спасибо Лене за предоставленную возможность связать это чудо! Пледик, скорее всего, отправится в мой магазинчик, так как никакого знакомого новорожденного бэбика у меня на примете нет...
Совместный проект закончился, и я продолжаю довязывать плед для старшей дочки, ей 9 лет. Когда пришла очередь для обвязки края, сама я хотела сделать край белым цветом, но думала, что Настя захочет розовый(это ее любимый цвет), а она выбрала - лимонный. Так тому и быть! Хотите подсмотреть? Вот первый ряд обвязки...
А ниже - "снежинковая" гирлянда связанная мною в подарок. Ниточки - Patons DK 100% хлопок.

Так получается, что я подпольно участвую в Обмене Новогодними Подарками, хотя и не писала письмо Санте, как того требуют правила. Снежинки, связанные по этому описанию, отправляются к Оксане, загляните в ее чудесный блог Oksana+Hobbies, не пожалеете! Оксана - мастерица на все руки, и к тому же - модница!
Совместный проект закончился, и я продолжаю довязывать плед для старшей дочки, ей 9 лет. Когда пришла очередь для обвязки края, сама я хотела сделать край белым цветом, но думала, что Настя захочет розовый(это ее любимый цвет), а она выбрала - лимонный. Так тому и быть! Хотите подсмотреть? Вот первый ряд обвязки...
А ниже - "снежинковая" гирлянда связанная мною в подарок. Ниточки - Patons DK 100% хлопок.
Так получается, что я подпольно участвую в Обмене Новогодними Подарками, хотя и не писала письмо Санте, как того требуют правила. Снежинки, связанные по этому описанию, отправляются к Оксане, загляните в ее чудесный блог Oksana+Hobbies, не пожалеете! Оксана - мастерица на все руки, и к тому же - модница!
Всем хорошего настроения!
Оля
♡
I'm linking to
Hookin On Hump Day #59 at My Merry Messy Life
Link Your Stuff! and here at Annemarie's Haakblog
Полетаем?
Thursday Weekly Creative and Features {11/21} at Craftionary
Busy Fingers Showing Off #23 at Busy Fingers, Busy Life
Hookin On Hump Day #59 at My Merry Messy Life
Link Your Stuff! and here at Annemarie's Haakblog
Полетаем?
Thursday Weekly Creative and Features {11/21} at Craftionary
Busy Fingers Showing Off #23 at Busy Fingers, Busy Life
Saturday, November 9, 2013
Bargello! wip 2
I'm taking part in Crochet-a-Long. We are crocheting a beautiful Bargello pattern (Ravelry link). Each Friday we have to add a link of the progress of our projects to designer's blog Step to Fly. And here you can see the link party after first week CAL was launched. Today I want to show you my progress. (My blanket on Ravelry) I love the result! Forgot to tell you, it will be a baby blanket. I hope there will be enough yarn in my stash to finish the blanket. As it is a stash buster project I don't want to buy more yarn for this. The yarn is Stylecraft Summer Breeze DK, it's a blend of cotton and acrylic fiber and it's such a soft and light yarn.
Sometimes in the morning is frost, so I took a nice picture of the nice November weather.
Take care of each other...
Olga
♡
Ну все же я взяла крючок 5,5мм, вяжу... Довольна! Вязать очень легко и так красиво получается. Полотно такое мягонькое.... мммм.... Правда после 8го цветовой полосы мой плед пошел небольшими волнами, поэтому в тех рядах, где мы в углу вяжем по две "ракушки" (это 3й, 7й, 11й и т.д. каждый 4й ряд), я убрала по одному ст/н из каждой ракушки. То есть я вяжу так: (2 ст/н, вп, 1 ст/н) первая "ракушка" готова, вп, (1 ст/н, вп, 2 ст/н) вторая "ракушка". На фото ниже я показала свой новый угол.
Ну и полотно расправилось, хотя все равно имеет тенденцию волниться... Ни слова ранее не сказала про планы. А план мой таков: вязать каждый день минимум 45 минут. Да-да, сижу с таймером. Сейчас в 45 мин еле-еле укладывается два цветовых ряда. Я бы вязала и дольше, но у меня на ходу еще куча начатых проектов, которые тоже хочется повязать.
На следующем фото - на пледе лежит малинка, которая все еще висит у нас в саду на кустах, и последнее яблочко, сорванное с дерева.
А вот так выглядит моя изнанка, ниточки я отрезаю после каждой смены цвета. Заправлять хвостики всё откладываю на потом, не очень люблю это дело. Можно их заправлять по ходу работы, но так как вязание - это праздник, а прятание(такое слово есть?) хвостиков - это работа, то я - за праздник каждый день :)
А фото ниже получилось одним морозным утром на этой неделе, когда мы с дочкой шли в садик. По утрам все чаще и чаще - небольшой мороз.
Берегите друг друга!
Оля
♡
Subscribe to:
Posts (Atom)


.jpg)
.jpg)
.jpg)
.jpg)
.jpg)


